Can you double or triple the speed of your test runs by switching out a few lines of code?
That’s what the team at Applitools is promising.
They’ve challenged test automation teams to speed up their test suites with their new Ultra-Fast Grid (UFG), which provides “massively parallel test automation across all browsers, devices, and viewports.”
To try it out myself, I took part of their Cross Browser Testing Hackathon, seeing if their new grid lived up to its claims.
What’s the Cross Browser Testing Hackathon?
In June of this year (2020), Applitools held an online Cross Browser Testing Hackathon. The challenge was to complete three automation tasks, attempting to catch bugs between two versions of the same app, using two different techniques.
While I really wanted to participate in it, I also needed to focus my efforts on my book, The Web App Testing Guidebook. As much as I wanted to, I just didn’t have to the time to commit to the hackathon.
So it came and went and I moved on with life. A few months later, Applitools reached out and asked if I’d be interested in covering the content via a series of live streams, plus this blog post. I thought the opportunity was a great fit, since I already had an interest in the topic, plus the work on my book had mostly wrapped up.
At this point, I should mention that Applitools is sponsoring all of this. I do my best to stay objective, but I want to be transparent with that.
“…with the UFG, you run your test setup scripts… once on your local machine, then the Applitools code takes a snapshot of the page HTML & CSS and sends it to the grid for processing. This means that we can run our filtering steps in the desktop view, yet still be able to capture our screenshots in mobile view via Applitools.
–Kevin Lamping
I should also mention what Applitools does. They are a “Next generation test automation platform powered by Visual AI”. I’m a big fan of Visual Regression Testing, seeing that I help maintain visualregressiontesting.com and have covered the approach many, many times since I first came across it back in 2013.
Applitools takes the Visual Regression Testing approach to a new level, which I talk about in my blog post “Visual Regression Testing is Stupid.”
The reason that Applitools put on the hackathon was to get people to try out their new “Ultra-Fast Grid”. Rather than try and describe what that is myself, I’ll use their own words: “With Ultrafast Grid, you run your functional & visual tests once locally and it instantly renders all screens across all combinations of browsers, devices, and viewports. This is all done with unprecedented security, stability, and speed, and with virtually no setup required.”
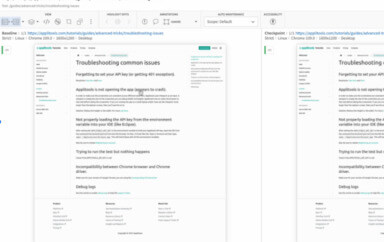
We’ll get to my thoughts on the UFG (Ultra-Fast Grid) in a bit, but let’s cover what the Hackathon entailed first. Here’s how the project page introduces the challenge:
Imagine you are a test automation engineer for “AppliFashion”, a high profile e-commerce company that sells fancy shoes. The AppliFashion web app is used by millions of people, using various devices and browsers to buy shoes. The 1st version of the app (V1) is already built and is “bug-free”. Your developers are now coming up with a newer version, version (V2) of the app, and assume that it’s full of bugs.
The challenge is to build the automation suite for the first version of the app and use it to find bugs in the second version (V2) of the app. You need to automate three (3) main tasks across seven (7) different combinations of browsers and screen resolutions (viewports). Further, you need to automate the tasks in both the traditional approach and the Modern approach through Visual AI, for both V1 and V2 versions of the app. By “traditional approach”, we mean without using Applitools Visual AI. You can execute the traditional tests either locally or by using other cross-browser cloud solutions that you are already familiar with.
That’s a pretty realistic scenario in my mind. That’s one of the things I really appreciated about this entire challenge; the scenarios were very “real world”. They took the time to create a project that reflected what you may face in a work-related project. I think that’s a testament to how valuable Visual Regression Testing can be.
How I Did It
Over a series of three 2-hour live streams, I worked through the three tasks assigned to the project (completing one task each stream).
As for tooling, I’m a huge fan of WebdriverIO. I used it, plus the Applitools WebdriverIO SDK, for my test framework. I also used Sauce Labs for my traditional cross-browser testing needs.
You can find a copy of the final code here:
https://github.com/klamping/applitools-hackathon-2020
Now let’s talk through each task. For the sake of brevity, I’ll be going through a high-level overview of each task, what I did, and my impressions comparing “traditional” testing vs. the Applitools “modern” approach.
Task 1 – Cross-Device Elements Test
The challenge started off with a relatively simple set of tests. The test would compose of loading the homepage, then validating the correct elements appear (or don’t) on the page.
Most of my time was spent on getting my project initialized and set up. I’m fairly familiar with WebdriverIO, so installation and configuration went pretty smoothly.
One challenge of the project is to test on multiple browsers and multiple viewports. The site being tested is responsive, so we needed to handle that functionality.
To handle this, I took advantage of the WebdriverIO setWindowSize command. Using it, plus a defined set of viewports, I was able to switch viewport size around as needed.
I added a few element display checks, but didn’t go too far down that path. Element display checks are pretty routine in WebdriverIO, so I didn’t feel like spending time repeating the same code again and again. In a real test I’d definitely want to though.
After writing the traditional tests, I switched to setting up Applitools and the Ultra-Fast Grid.
While there is an Applitools service for WebdriverIO, it’s not updated to support the UFG yet, so I stuck with using the SDK they provide.
I had to read through the documentation a bit to get it all set up, but I was able to figure it out without too much pain.
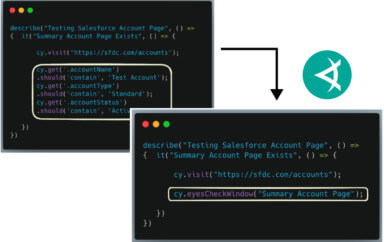
After setting it up, writing my test was an absolute breeze. This is essentially the entirety of my test script:
home.load();

browser.call(() => {
    return eyes.check('Cross-Device Elements Test', Target.window())
})
All we do is load the home page, then take a screenshot of the entire window, then send it off to Applitools.
Already, there’s a large difference between the traditional approach of manually writing element display checks, and just relying on the Applitools AI to handle all of that for us.
This is one of the true powers of Visual Regression Testing (VRT), and it shines in this example. VRT implicity checks text content, color, display, size and much more without you having to specifically ask for it for each and every element. It really is a fantastic technique for testing the UI of sites.
But, did the UFG live up to its promise of fast speeds? Well, at this point, not really.
For a good reason though. The tests we’ve written so far are extremely simple. They load a page and check a couple of items. There’s no login steps or other preperation steps needed to get to where we need to be in order to test. Because of that, the UFG doesn’t really get to flex its muscles and show off. But it’ll show off soon enough.
Task 2 – Shopping Experience Test
Next up on task list is to try filtering the product grid. I enjoyed this task, because it gave me the chance to show off how to extend Page Objects through the use of Components. I won’t cover it here, but check out the stream if you’re interested.
The traditional test was pretty straight-forward again. I did need to spend a little bit of extra time handling the filter functionality across viewports, but the way I set up the viewports made this much easier than it could have been.
So how did the modern approach compare? Well, it matched more evenly with the traditional approach this time, taking about the same level of coding effort. Both approaches caught the main bug on V2 of the site, which is that the shoes aren’t properly filtered.
One big difference between the two approaches is that the extra functionality I needed to write to handle the filter viewport differences isn’t needed in the modern approach. That’s because of the way the UFG works.
The reason why is that with the UFG, you run your test setup scripts (e.g., clicking the filter menu and selecting the options) once on your local machine, then the Applitools code takes a snapshot of the page HTML & CSS and sends it to the grid for processing. This means that we can run our filtering steps in the desktop view, yet still be able to capture our screenshots in mobile view via Applitools.
We’ll dive deeper into the benefits of this approach later, but I wanted to mention this specific difference here.
Task 3 – Product Details Test
For our final task, we take a look at the product detail page.
Thankfully, we’re able to re-use a lot of our previously written test code, as the steps to select the product needed are almost the same as our previous task (just adding the step to click the product link).
The main challenge of the test is writing the various assertions needed to check all the product details. There are several details to validate, including the name, price, SKU, description and more.
This puts us in a similar situation to Task 1, where we have multiple minor details on a page that we have to write assertions for. And similar to Task 1, using VRT really helps in this regard.
Not only does it help reduce the monotony of writing these assertions, in this task, it caught several bugs that my traditional tests didn’t. This is due to both me taking a shortcut by not writing all my checks, but also because my checks honestly wouldn’t have caught some of the bugs.
Here are three bugs that my traditional tests didn’t catch:
- SKU Number not shown. This is due to the text color matching the background. WebdriverIO’s
isDisplayedcommand absolutely won’t catch this, since it doesn’t check for text color vs. background. - The text of dropdown changed. This is just too minute of a detail for me to write a test for. If I had to spend my time on things like that, not only would it take forever to write a full test suite, but keeping that suite up-to-date would be an absolute pain.
- In the price, it changed from $33.00 to only $33. Again, this would be a very difficult thing to test for and would take a lot of time to get that level of detail using the traditional approach. But using VRT catches it with minimal effort.
I have a sneaking suspicion that the project was set up to highlight these sorts of bugs, and I don’t blame the creators one bit for exposing it. VRT is a very powerful technique and there’s nothing wrong about showing off specific examples of why.
Overall Feelings/Observations
So that finishes up all three tasks. Now for some overall observations. I’ve talked about the difference between VRT and traditional testing, so I won’t cover that much here. I hope I made my point there.
But there are several other observations I had over the course of the work.
UFG’s Speed
Let’s look at the speed improvements that UFG claims to provide.
Honestly, in these tasks, UFG’s speed didn’t get to shine. There are a few of reasons why that is.
WebdriverIO is Already Fast
The first is that WebdriverIO provides the ability to run tests in parallel by default, so I was able to run all three of my test files at the same time with little effort.
This is important, because if each of my traditional tests take 5 seconds extra, normally that would cost me 15 total seconds. But since those 5 seconds all occur at the same time (since the tests all run at the same time), then the pain is minimized.
But this parallelization only gets you so far. Due to computing limitations, you can only run so many tests at the same time. As you add more tests, you’ll quickly reach the limit of browsers you can run at once.
Let’s take an example of 80 tests that need to run on 8 environments (i.e., different devices/browsers/viewports). You will need to run these 80 tests, 8 times each test, which is 640 total runs.
Even if you could run 20 tests in parallel, you’d still have to go through 32 cycles of testing.
With UFG, you would only need to run 80 tests in parallel once (you can run all the tests on one environment in parallel with WebdriverIO). Divide that by 20, and you have only 4 cycles to complete. That’s 8x faster, because you don’t have to run each test 8 separate times for each environment.
So while it’s not too evident on small scales, once you level up your test suite, UFG’s speed really starts to show.
The Speed Pedal Wasn’t Pushed
While these example tests are useful as a demonstration, they aren’t very complex. They simply don’t do enough compared to what a more real-world example would look like.
Looking back, almost all the tests I’ve written over my career have involved some sort of login flow, which we didn’t have in our examples. And, in my experience, the login flow can be painfully slow, as the tests run through their extensive authorization process.
To simulate a more real-world example, what if we add an arbitrary 10 second pause in our tests? Let’s add it right after we load the page for each of our viewports/tasks. This pause is similar to what a login flow would take to run, so imagine it’s that.
When added up, this 10-second delay would add over 70 seconds to our overall test run using the traditional approach.
Why? Well, since that pause happens in our beforeEach hook, it occurs for each of our tests. With 7 total tests (3 each for Task 1 and 2, and once for Task 3), that’s 70 seconds.
Then, we take that 70 second delay, and multiply it by the number of browsers we’re testing in, which is 3. Now we’re 210 seconds slower due to this unavoidable delay.
The Ultra-Fast Grid avoids most of those slow downs. Remember, our modern tests only needs to run the setup steps once per file, since the UFG handles the multi-browser aspect of everything.
So at most, we’re going to see 30 seconds added to our tests (10 seconds for each file). That’s three minutes of testing time saved over just 7 tests. And, no matter how many browsers we add to our suite, UFG always only takes 30 seconds, while traditional methods grow and grow.
Visual Regression Testing is Powerful
The other part to consider here is that the UFG is running a full visual regression. That’s doing a lot more work than our traditional tests were.
Consider our first task. I ran about two assertions per test, getting the text of a couple elements and checking them.
What did our modern approach check? Well, essentially everything on the page. It checked the display and text of all the elements. It checked their visual display, including color, spacing, font size, font style, on and on.
It checked background colors, images, and overall layout. It ran hundreds, maybe thousdands, of assertions in the time it takes a traditional test to run two.
Aside from the test run time, it also provided a huge amount of savings from the test writing time. I don’t think I can emphasize enough how much simpler it is to write a visual regression check. I can’t imagine having to write all those thousands of assertions myself (or even worse, have to use my own eyes to manually check everything).
So, all those things considered, I really think I barely scratched the surface in the speed improvements that the UFG provides. It’s like taking a race car for a drive through a congested street, when it really deserves to be taken out to the race track.
Reduced Flakiness
Okay, so not only is the UFG faster than traditional testing (while also being far more powerful), it also reduces test flakiness.
By minimizing the number of times we’re going through specific actions, we’re reducing the number of interactions we have with potentially finicky flows.
Take the Login flow for example (which, in my experience, can be flaky on test servers). Say that, through no fault of the tests themselves, there’s an odd bug in the staging environment where every 100th login fails. This isn’t much of an issue for a manual test, since you’d just retry your login. But it’s a real pain for an automated test, since that failure can happen in the middle of a test run.
Using our example of 80 tests on 8 environments from before, using the traditional approach, we’d get at least 6 test failures due to the login bug (we login 640 times, so hit that magic 100 number 6 times).
But with the UFG, we’re only running our 80 tests once. We go from a sure six failures, to likely none at all. Even though we have all the same test coverage from before, we’ve minimized our interactions with the app to avoid errant failures.
One Final Wish
I’ll end this all with a wish. I’d love to see the official WebdriverIO Applitools service updated to include integrating the UFG features.
While Applitools does provide an SDK for WebdriverIO, which includes support for UFG, it’s not quite as integrated into WebdriverIO as the @wdio/applitools-service is.
Fore example, for the sake of time during this project, I just copied over my UFG initilization code from test to test. But in a real job, I’d definitely want to avoid that. While I could set it up myself using a custom wdio.conf.js configuration, an update to the @wdio/applitools-service could be made to handle this for me in a simple way.
It would also help avoid having to wrap all my Applitools commands in browser.call, which can get clunky.
WebdriverIO services are perfect for minimizing the set up code. Seeing as there’s already an Applitools service, I hope it gets updated soon so I can use this functionality with even less work!
Overall, I really enjoyed the chance to implement this hackathon, and was impressed with what Applitools has to offer. I’m definitely going to see where I can use this in my work make the move to modern testing!
Cover Photo by Alexandria Bates on Unsplash